How to shorten the Pinto sump
by Jim Stott
First of all, go down to your local scrap yard and get yourself a sump & pick up pipe. This means that you can shorten it in stages and you aren't off the road, and if you make a complete mess of it, you've only scrapped an old sump and not the one off your pride and joy.
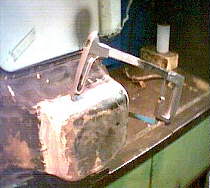
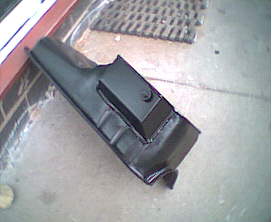
Clean the old sump as best you can, getting as much of the old paint off, it will make things a lot easier later on. Check that the fitting faces are not damaged or deformed. Now we need to measure off where we are going to cut, this is 5½ inches from the fitting face. (when finished, the sump will be level with the bottom of the gearbox bell housing.)
|
|

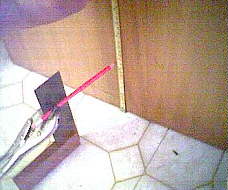
If you can get hold of a scribing block, set it at 5½", or you can use a pencil clamped to a block or square. Don't forget to check to see if it's altered as you use it!
Now scribe a line around the sump (I've put some old emulsion paint on to assist seeing the line). You will find that you can't get all the way across the front of the sump, so just join up your lines from each corner with a rule.
|
|
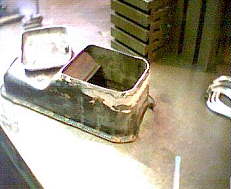
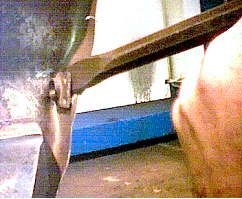
Now comes a tricky bit, get this wrong and it makes welding up a bit awkward later! By holding the sump in the vice, (you'll need to use a small piece of packing on the back of the fitting face, so as not to damage it), saw off the bottom of the sump, by going in from each corner and meeting the cuts along the faces.
If your saw cuts meet up OK, then you're left with something like this.
Don't throw that bottom piece away just yet, we need the 'nut' for the sump plug. Dress the edges so that it will sit reasonably well on the cut edge. You can either plate it now,and forget about putting the extension piece on, or as I will show you, you can modify it to give back some of the oil capacity that you've lost.
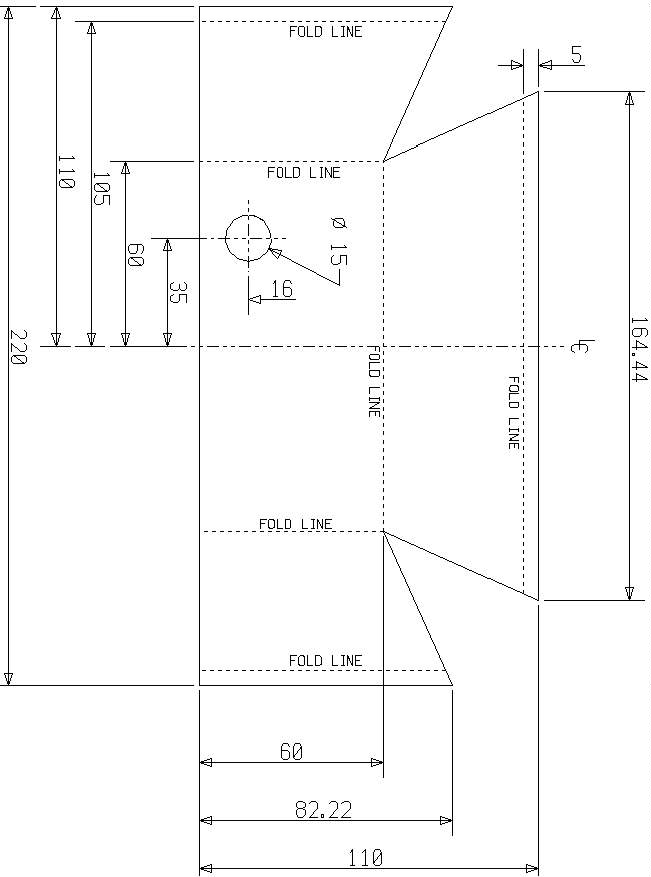
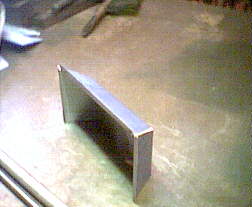
Now we're going to make the sump 'extension' to give us some of that oil capacity back Included in this article is a drawing for guidance on cutting the piece of plate to make this extension. The easiest way, is to draw it out on a piece of paper,cut it out, then just draw around it onto the metal. I used 1½ mm thick steel plate here. Note: the sizes are just about the maximum that can be used, otherwise if you make it wider, it will interfere with the clutch cable, and it you make it higher, you will have difficulty getting the sump bolts in later. Take your time marking it out, bending it can be a little difficult but can be done in a vice with a mallet, unless of course you have a sheet metal working type of friend to do it on proper equipment! Or try the local garage if they have a hand bender.
Here we have the extension bent up, ready to fix the sump plug 'nut' into.
 -
- 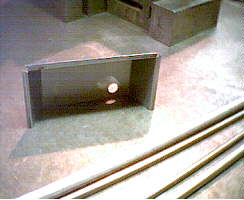
From the old piece of sump that you cut off earlier, chisel off the sump nut. It's been impact welded on, where the two dimples are. Dress the rough pieces off afterwards. Remove the plastic sealing washer from the sump plug, and with a few extra steel washers put the sump plug through the extension and tighten it into the nut to hold it in place. Now the nut can be welded in - you only need to weld just across the top flat bit, the sump plug washer seals it afterwards.
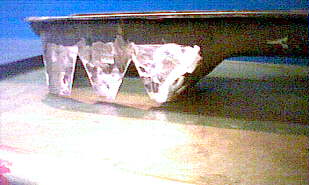
Don't weld up the folded corners of the extension yet,just tac it. Then put it against the side of the sump, (right hand side! Not where the starter motor will be on the other side), and draw a line around the edges. Within that line, and at least 8mm from the top one, and 10-15mm from the side ones, you need to cut a couple of inverted 'V's (for the oil to flow through, once the sump is finished, check that at least one of these cuts goes up as far as possible to stop 'air pockets'). Try your new extension piece against the side of the sump as you might need to straighten out any ribs in the sump side, just where you are going to weld.
..........................................................................................................................................
YOU NOW NEED TO SORT OUT THE PICK-UP PIPE, BEFORE YOU GET THE WHOLE THING WELDED UP.
The oil pick up pipe
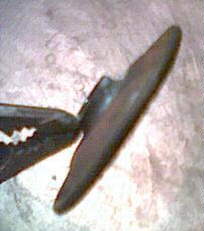
| First of all remove the mesh strainer from the pipe - all you need to do is grip the strainer gently in a vice, and then apply a welding torch gently to the joint, you will need to get this farely hot to melt the braze / solder, and by twisting the pipe to & fro gently as you warm it up, it will come out of the strainer basket. |
|
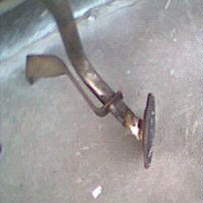
With a pair of pliers, open up one side of the entry lip of the strainer hole. Cut the pipe back to the bend, and try the strainer on it to see if it sits square. (Hold the bracket down flat). You need to check how high the strainer will be from the engine block, because don't forget, your sump is now only 5½" deep and you want the mesh to be about 5-6mm away from the bottom when it's all bolted up. Therefore keep trying it - you may have to cut some more off the pipe until you get it just right, then braze the strainer back onto the pipe. As you can see, the strainer finishes up right on the bend of the pipe. Make sure that you clean it all up, and there's no bits of metal filings left in the pipe.
| To see if you've got it right, with the sump sat on it's fitting face, put the pipe inside the sump and hold down on the bracket mounting hole. The strainer basket should be level and about 5mm below where the baseplate will be welded onto the sump.
It is a bit awkward to get it correct, as the strainer needs to be brazed back on, just onto the start of the bend in the pipe. Make sure that you clean any flux etc away afterwards. |
|
Now that the pick-up pipe is ready, we can finish welding up the sump.
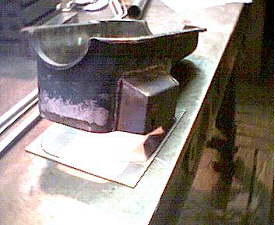
Now you need to cut a piece of plate for the bottom, I used 3mm here, so as to give it some strength, just in case there is still the chance of giving it a smack. If you hold the open base of your sump onto the plate, then draw around it with a felt tip marker, all you need to do is cut out the shape along the line. This will leave you a nice little 'overhang' of about 1mm all the way around it, which will help when you weld it on.
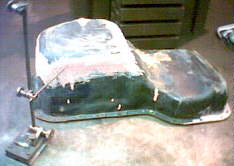
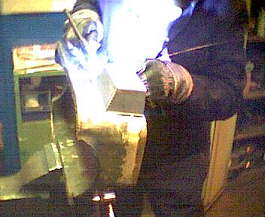
Once you feel that it will fit together without leaving gaps big enough that you can throw a spanner through, now is the time to tac weld the extension to the sump side, then tack the plate to the bottom. you can now either go ahead and weld the whole thing up yourself, or take it to you local coded welder to make a 'proper' job.
|
|
|
|
Draw around for the base plate. |
We TIG welded it, (not really by me, but by someone who can do it properly) but good jobs have been made with MIG or even Oxy-acetalyne. |
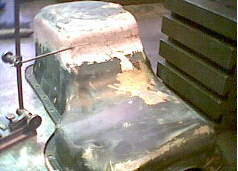
OK, it's all welded up, But will it leak? check this BEFORE you paint it.
I checked this one with a special die made for such purposes, but I think that if you were to fit a new sump plug and washer, then stand it on some paper, fill it with water as much as possible, ensuring that the outside is perfectly dry, and leave it for an hour or so to see if the paper gets wet anywhere, this would be just as good a test.
| Once you're happy, paint the outside. |
|
Now everything is finished, all you have to do is fit it to your pride and joy, remember to use new gaskets etc, and DON'T use sealant on them, if any excess gets into you oil, it can block up the strainer, leading to dire problems, I always use grease to hold the sump gasket in place whilst I fit the sump.
Last but not least, remember, you've not as much oil as you had before if the level falls low you could damage your engine, so you MUST run at top level of the dipstick. (Don't alter the dipstick in anyway) After about a week or so, check the tightness of the sump bolts.
Digram of additional extension oil box