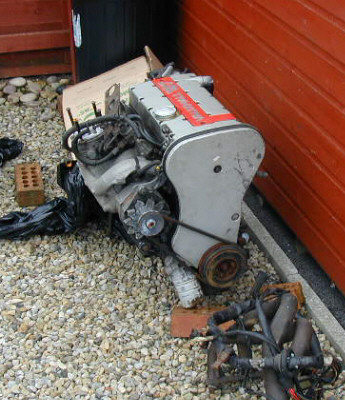
Vauxhall 2 ltr 16v engine, to go into my mark 3 Robin Hood instead of the Pinto
OK, this is intentionally somewhat back to front. In Blue are comments and alterations that I've done since running the engine in the car now for some time.
Go past to The Black text, for the initial part of the article.
| I have now been running it for a few months, with a number of the shows attended, it's had a couple of runs out as well, so I've clocked up about 1000+ miles since it was fitted. A number of things have been "tweaked." The mapped ignition has been altered to soften it down a bit, this has made it much more drivable, at 70 mph now I am hardly touching the accelerator, bringing in a fuel consumption figure well over 30 mpg. The carbs did go out of balance once or twice, but I have now got the knack at re-doing them. I have found that the Custom Chrome 5" silencer that I had on, even after re-packing it, is not as quiet as I would like it, and I may consider changing to a "Wunoff" system. ( New Wunoff silencer fitted)
I have altered the thermostat to run cooler (83º), and I have fitted a 2 temp sender switch, available from Premier Wiring for £8, coupled with the 2 speed electric fan, which works brilliantly.
|
| I have also got myself a 'spare' engine tucked away in the back of the garage, just in case the right foot gets too heavy and I blow it! |
| I am now 10 months on, and have put over 6,000 miles on it since the swap. I have made a few more changes, the brakes I still did not feel confident with them, so I have fitted disc's to the rear axle, I used adapter plates on the original axle, not changing the whole thing (there is an article about it on the build page) this has made the brakes feel OK now, I'm much happier.
You will also need to fit an oil catch tank to the engine breather pipe, as oil tends to 'splash' out of it at revs.
After nearly 3,000 miles around France in high summer, the engine behaved brilliantly, but the clutch / gearbox wasn't as good as I would have liked them. As it became hot, It became difficult getting 1st or reverse gear from a standstill, as the clutch seemed to be dragging. I have now had the engine out, and changed the clutch spinner (friction plate) for one that is a perfect size (from a V4, 2.3 ltr sierra, 228mm O/D) but when I put it back together, the fault persisted. On further investigation, I found that I needed to pull the clutch cable a bit more to get a 'clean' gate. with the set up that I had, it was impossible, as the pedal was hitting the carpet, and was 'up' as far as I could let it. Then we found out that there are different sizes of clutch ratchets. The standard Sierra one (yellow) is 45mm from the pivot centre to where the cable lies, but we found that you can get them, where this measurement is 50mm or 55mm. The outer ratchet part of the quadrants are identical, it's just how deep the channel is were the cable sits.
On fitting the 50mm one, there was still a slight "snick" on putting it into 1st, after fitting the 55mm one, it became smooth & clean, so for a sum of £5 the problem was solved.
The sump gasket is leaking slightly, but it will have to wait now until next winter. (This is a common fault, the cure I am told, is a new Windage plate that has a rubber gasket moulded to both sides of it.)
|
FITTING THE VAUXHALL XE 16v ENGINE INTO A ROBIN HOOD MARK3.
We all get it sooner or later, the itch! you know, that feeling when you've got your right foot hard on the floor, and the buggers not going fast enough! I WANT MORE POWER!!
The choices were, mess about with the Pinto, but there's only so far that you can go with that, and I already had a fast road cam and a 38 DGAS. So that wasn't an option, it had to be and engine change, but what??
Various engines have been fitted to Hoods, each with reasonable results:..................................
Rover V8. Still a stalwart, loads of torque, but once it's in, there's no room to work on it afterwards, and it's getting a bit dated now.
Toyota 16v. A revy little engine, 135 BHP, doesn't seam a lot more than the Pinto, and the cost is horrendous!!
I gave over counting after I'd added up past £2000 for the "extra's" needed to put it in the Hood.
Ford Zetec. Hmm... wasn't impressed after asking "Dave the Gauge" how his was after fitting one. He didn't enthuse about it. Also there were rumours of large sums of money being spent to do the conversion.
Rover K series. I've only found one web site where someone is fitting one of these in a Hood, and he's having to butcher the car engine bay, and to make extra strengthening in the engine bay to replace what he's cut out etc. NO I don't fancy that!
Ford Cosworth. I'd read Dave Andrews web site about how he fitted his, and what he did to the internals of the engine to make it into a "nice" usable motor on carbs, I didn't want to start major internal work, so I thought about leaving it with the Turbo etc. until I saw a Dutton at Donington with one in, God it's a plumbers nightmare. Also second-hand engines are still bringing an unreasonable amount of money. No forget it, too pricey!
Vauxhall XE 16v. Ian Cairns has managed to fit one in his, Simon Cooper has one in his, and both of them say that this is the engine to go for. (Also Andy Campbell is fitting one in his 2B instead of a Pinto) link
OK, that's it, I've made my mind up, a Vauxhall 2 ltr 16v lump it will be! Ian & Simon say that a budget of around £1400 should complete the job.
|
Now I scan through the various "For Sale" web sites, I find an engine on E-bay, with a reserve of £350, but will sell outright for £500. After a few e-mails to ascertain what is with the engine (I was told by IC & SC to make sure that I get the starter, clutch & exhaust manifold as well.
I watch the auction, but it ends without a bid being made, so I contacted him and offered him £300 if it was a "good un" A little ride over to Yorkshire and then it was in my trailer and on it's way back home.
|
 |
At this stage of the game, I now start to be a bit of a nuisance to Ian Cairns and Simon Cooper, who have been most helpfull putting up with all my questions, THANKS GUYS!
I start to order the various specialist bits, bell housing, manifold, sump etc.( a full price list will appear at the end of this write up.) Fortunately, I am not removing the Pinto until after the Exeter show, and it's a good job, because the bell housing and sump aren't in stock, and aren't expected for 3 or 4 weeks.
I do get the new ARP super-duper big eng bolts, so that the bottom end isn't going to let go if the accelerator gets trod on too much. Be aware though, they are bloody expensive, £64 +p&p for 8 bolts!!!
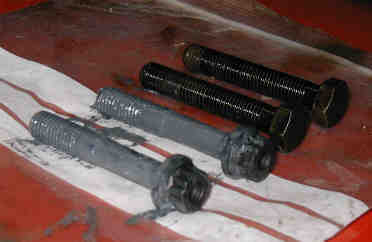 |
The new bolts are the ones on the left, coated in special lubricant ready for using. |
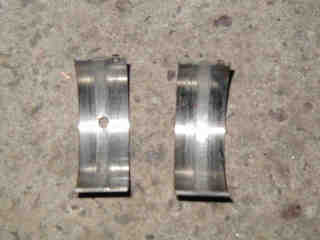 |
Whist changing the big end bolts, the last one that I open up, I find that the shell bearing has "picked up" along the oil way. Fortunately there is no real damage to the crankshaft journal, but I lightly rubbed it with 1200 wet & dry to make sure that there isn't anything left that will score the new bearing. |
|
A big end cap, complete with new shell bearings, oiled up and ready to fit. Special instruction on how the bolts should be tightened & torqued up are given with each set of bolts.
|
To change the main bearing shells in the block, once the cap is off, tap the end of the shell with a hammer and tip of a screwdriver, very carefully, on the opposite side to it's location lug, to remove it from it's seating position (note the little lug on the shell bearings) then by pressing the bearing unto the crank, turn the crank and it will hopefully spin out. Make sure that you put plenty of clean oil onto the new bearing before "spinning" it back in place.
The main bearings caps can be a little awkward, you can get numbers 1 - 4 caps off easy enough, but the last cap is part of the rear engine oil seal housing. You have to remove the flywheel to get to this one. Once the flywheel is off, you can undo the bolts in the end cap, and by tapping the cap from side to side with a plastic / hide hammer the cap will come off, then just remove the old c/shaft oil seal. After cleaning the cap up by removing the old sealant from the 2 hemispherical (½ round, for the thicker ones amongst us!) slots that are in the sides of the cap, fit the new bearing shells, fill the slots with new silicone sealant and refit the cap. Wipe off any excess sealant then torque up the main bearing cap bolts. Fit a new rear crankshaft oil seal, but don't forget to lightly oil it first so that it won't burn up before oil does get to it when you start the engine.
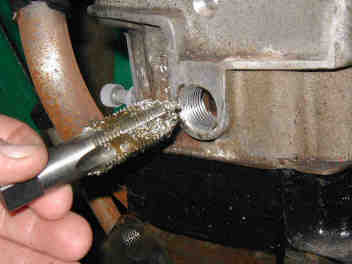 |
Another job that can be done is to remove the water pipe from the rear of the cylinder head then plug the hole.
The pipe can be remove easily with a pair of mole grips by twisting it out. Tap out the hole with an ½" BSP taper tap, (Tip; half fill the "slots" of the tap with grease to catch the swarf cuttings) Now get a brass taper plug from your local plumbers merchants, and screw it in with either plumbers tape or thread lock etc.
|
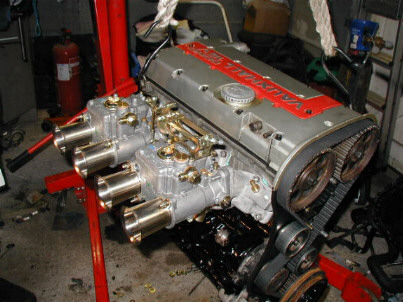
| I have now got most of the special parts that are needed to convert the engine from and East-West configaration, to a North-South job that is need in the Hood, I'm only waiting the sump to arrive then it will be built up just waiting for the car to be available once the Exeter show has been attended.
Whilst making a new alternator mounting bracket for one of the 2B builders in my area, I also decided that I would look at mounting the alternator onto the lefthand side of this engine as recommended by Mr Cairns. This is because there's the steering shaft and all the carbs on the right-hand side.
|
|
|
|
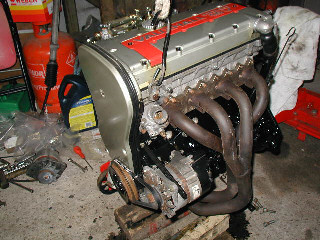
Obviously the alternator that came with the engine wouldn't fit (unless I put it upside down) but I found one in my garage, similar to the Lucas one normally fitted to the Sierra. The bracket was made, new fan belt fitted, then when I mentioned it to Simon Cooper, he asked if the exhaust would clear it, OH Shit! I hadn't checked that.
Engine jacked up, exhaust offered to it, and YES, it goes on. Phew! The exhaust is the one that came with the engine, it will get modified later. (I do alter this later as the alternator was too close to the exhaust)
|
|
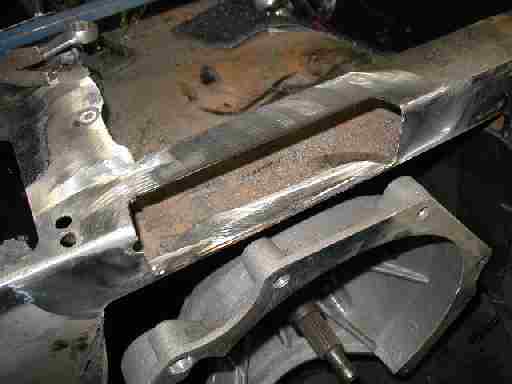
The nice new sump finally came from QED and it's an excellent piece of kit, it has a couple of vertical baffles, with one large baffle virtually covering the whole sump horizontally, there's just a hole for the oil pick up basket to go through, and smaller"cracks" around the edges to allow the oil to return.
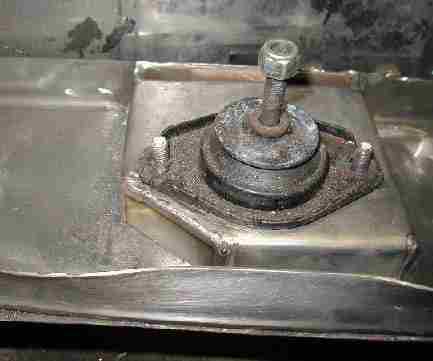
Now this is where I drop a big BOLLOCK! The distructions that come with the sump, say to fit the original "windage" or baffle plate. This is where I have a total blank, and completely forget how it came off, thinking that I need to modify it for the new oil pipe, I cut a f****king big hole in it, then I find out that I shouldn't have done!! Mr Vauxhall very kindly sold me a new plate for £15+vat.
|
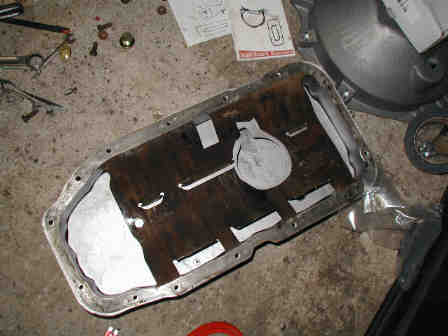
(This incorrect, that bloody great hole shouldn't be there!)
|
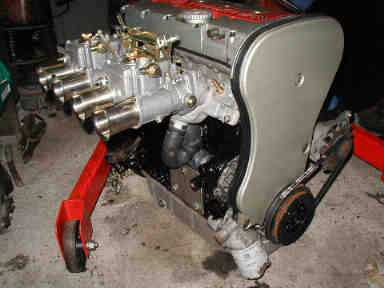 |
Putting the sump on can be fun as there are 2 gaskets, the baffle plate, and the sump to hold in place, all at the same time. Oh! and the gaskets have small metal spacers around each hole that can easily be dislodged with the bolt! I found it best to use a few very long 8mm bolts first, just to line everything up. Don't over tighten the sump bolts.
You can see that the sump is the full length of the engine. The filter will be changed when I'm ready to fill with oil, the plates on the side of the engine, are for the new engine mountings to start from.
|
| Right! this is where the serious stuff starts!
Mr Pinto, you are the weakest link, goodbye!
Before trying the Vauxhall engine, I fitted the new bell housing to the gearbox. First I needed to open out the holes in it, to suite the bolts which are a fine thread, SBD want to charge you £25 for 4 bolts, I got them for £2-50p from my local fixings supplier. Hmmmmm!
|
 |
 |
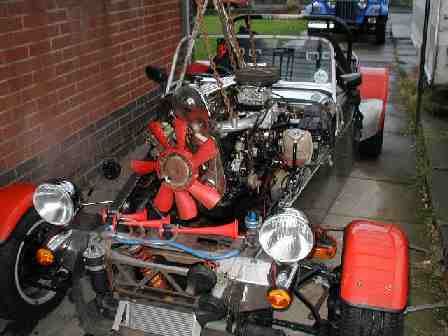
Ok, the Pinto engine is out, and it's time to have a look if the Vauxhall lump will go in.
Answer = NO, not yet anyway! I was hoping beyond hope that I could get away with leaving the sierra pedal box in, but there's no way the engine will think about going in with that there.
(Note; On a 2B you only need to remove the servo, the rest of the pedal box assembly can stay)
Also I need to trim back the floor plates in the engine bay flush with the engine mounting skids, to allow room for the sump & oil filter.
|
| I decided not to pussyfoot around anymore, I'd reached the point of no return! scuttle off, and the sierra pedal box was removed with "extreme prejudice" (& angle grinder)
I'll worry about those at a later date, let's get the thing in first!
|
 |
| Remember how earlier on, I told you to tap out the hole in the back of the cylinder head with a TAPERED ½"BSP tap, well due to a mix up, I tapped it with a normal tap, so I've had to fit a normal plug and washer, that meant the bugger was hard on against the bulkhead, so I've had to cut some away to releave it. I'll get it welded up later. |
 |
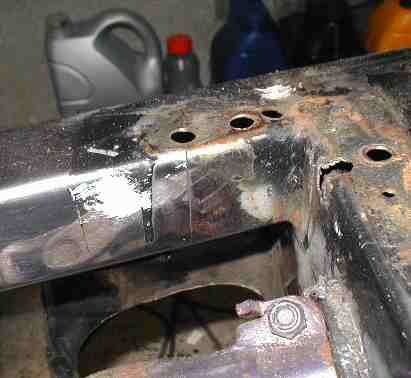 |
Well there's the crack! too many holes have been drilled through the stainless, making it weak.
I need to remove some of the bulkhead in the centre, to allow room for the plug at the rear of the engine.
|
 |
|
|
|
|
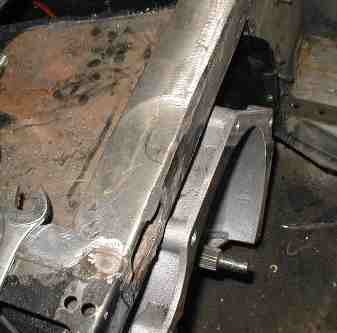
The finished article, ready to be welded back in. |
|
|
 |
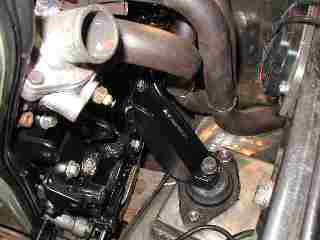 |
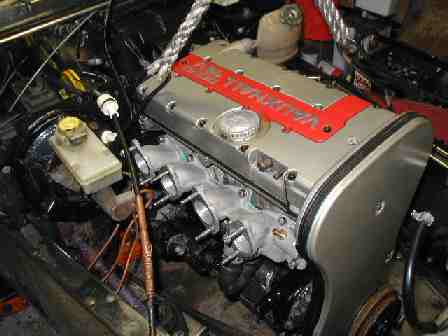
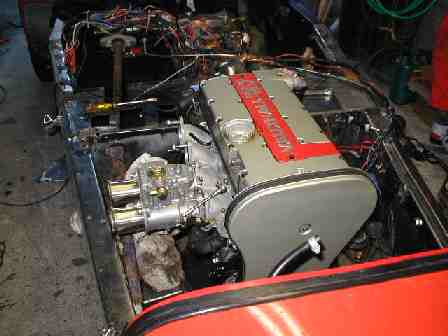
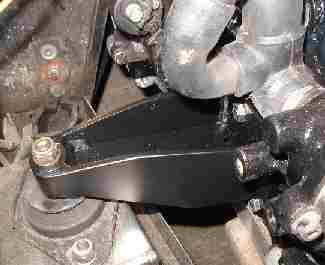
Once all the welding was complete, the engine was fitted back in, and engine mounting brackets were designed and made, the left hand one had to be made to clear the exhaust manifold. |
|
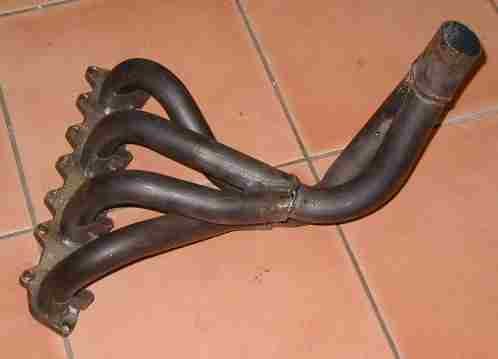
| The exhaust manifold, is the original Vauxhall one, cut at the joint where 4 go into 2 (cut at the 2 end, I didn't, and it was then hard work!) you then need to cut the pipes as far down as you can but so that you can weld them back together after turning things about. ( you'll see what I mean) |
 |
|
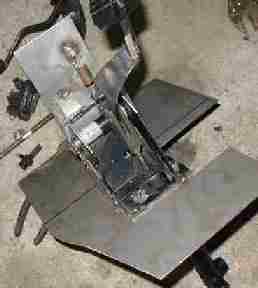
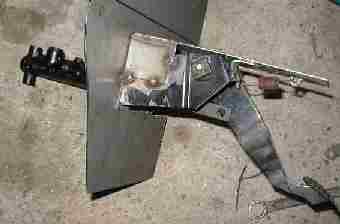 Just a couple of photo's of the VW Polo pedal box, cut down just for the brake pedal. It's tacked up ready for final weld after a couple of small adjustments. Just a couple of photo's of the VW Polo pedal box, cut down just for the brake pedal. It's tacked up ready for final weld after a couple of small adjustments. |
 |
| Ok. it's time we had a new page I think! so click the hand! |
 |
|